

Have you ever felt that a 14mm F2.8 Rectilinear lens on a Full Frame DSLR just wasn't wide enough?
Have you ever wanted to shoot wider than the field of view of your lens?
You can... with a 24mm.
Welcome to ASTRORDINARY Imaging. My name is Paean Ng, a self-taught astrophotographer based in Perth, Western Australia.
I've recently been asked by several people to write tutorials on how I produce my images. So here's the first tutorial in a new "How to" series.
I've been using the Sigma 24mm F1.4 ART lens along with a Nikon D750 as my main shooting combo for the past year and have come to know this particular set up intimately. Along with my Gigapan Epic Pro, this is the main set up I use to shoot panoramas and photospheres.
People prefer different looks to their photos. Some like the standard 50mm perspective and some like the ultra-wide and distorted perspective. It's important to know, however, that the perspective of the resulting panorama will be the same as the perspective of the lens it was shot on. In other words, stitching multiple images shot on a 24mm will NOT result in an image that looks like a 14mm. It will just look like a very wide 24mm perspective.
With that being said, I like the 24mm perspective because it's the widest angle in the standard 24-70 field of view.
Lets jump right in. I'll be basing this tutorial on a panorama I shot at Sugarloaf Rock, Dunsborough.
This is the equipment and settings that were used.
Equipment:
Nikon D750
Sigma 24mm ART
Gigapan Epic Pro
Shooting Settings:
ISO 3200
F2.0
20 seconds
35 frames. (7x5 grid in landscape orientation)
Before the stitching process begins, I first prepare the images by importing them into Lightroom and applying the appropriate Lens Correction Profiles and roughly change the White Balance of the image. Sync the changes throughout all the images and export them as 16bit TIFF files.
My preferred stitching software is Autopano Giga. It's extremely powerful and really simple to use, but it does cost. A free alternative is Microsoft ICE. You won't have all the functionality of a paid product, but it works.
Import the prepared images into Autopano Giga and click "Settings", which is the Spanner icon next to "Detect".

These are the settings I use. I find that keeping the "Detection" on automatic works best.

Ensure all colour corrections options have been turned off.

Once all the settings are correct, go ahead and click the "Detect" button and let Autopano Giga do it's thing. Once the initial detection is done, you will be see something like this:

Double click on the projected image on the right to bring up the Edit screen. If the image looks distorted, split, incomplete or anything else that might get you worried, relax, its normal. We'll fix it.

Use the "Move" tool to reposition the image until it is centered.


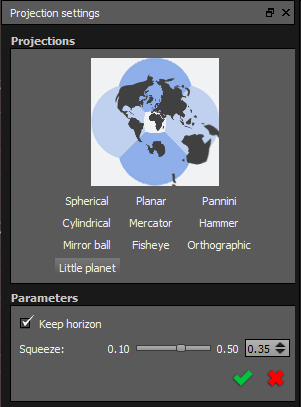
By default, Autopano Giga will project the image as a Spherical projection. You can change the way the panorama is projected by changing the Projection Settings:

The Projection I use most is "Little Planet" with a locked Horizon. This style of projection is the same as a Stereographic projection in Microsoft ICE and PTGui. Play around with the different projections and you might find something you like.


Now we need to resize the projection by sliding the "Squeeze" button up to around 0.35 and crop out the unwanted parts.

Now we have a working image, scaled to the correct size and roughly cropped to what we want. If the panorama was shot correctly, you shoudn't run into any stitch errors. If you do have errors, however, they can be fixed by manually adding control points by clicking on the "Control Point" button.

If you find a stitch error in the sky, don't bother correcting it. There are thousands of stars in each frame, I doubt a minor stitch error is going to make a difference to that.

Once you're satisfied, render the image with the following settings and then import it to Lightroom.

Ensure the image is rendered as a TIFF file at 16bits, 300dpi to maintain all the RAW goodness for processing in Lightroom.

Final Edit.

There we go, that's the way I stitch my panoramas. I hope this guide was useful. Please leave a comment and follow me on facebook. www.facebook.com/astrordinary
Paean Ng